
|
| protein skimmers | calcium reactors | kalk reactors | waste collectors | custom sumps | overflows | accessories | | |
|
Home
Advantages of Barr Systems Pumps Instructions DIY Threads Order Page |
Sump plumbing:All Sumps and Refugiums 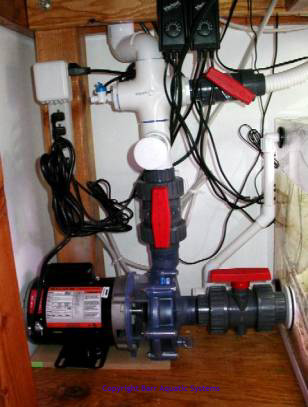
Inspection: Inspect your new sump upon receipt. Any damage must be reported to the shipper with 24 hours, or they may not cover the damage. Contact us immediately if there looks to be damage. We will repair or replace the part(s) as needed. Unfortunately we can take no action until the damage claim is validated by the shipper. Things to look for:
Pump Installation: In order to be able to remove and clean the pump without having to drain the sump, it is important to use a dual union ball valve as shown. These valves have a union on each side of the valve. If you can't find these (they are available at Aquaticeco.com), then you can make them out of a standard ball valve and two unions, although that takes up more space. Use the largest valves and plumbing that you can fit. It should be not less than 1", and if the pump moves more than 2000gph, it should be 1.5". The pump shown above is a Sequence 5200, and is plumbed with 1.5" valves. Shown below is a Sequence 3600, also plumbed with 1.5" valves (old valves). In the above picture there is a 1.5" threaded bulkhead, a 1.5" close threaded adapter, the ball valve, another close threaded adaper, and then the pump. Notice out short and tight the installation is. There is about 1/16" of an inch between the pump and the wall. Next time I make the sump 48" long instead of 50". Exiting the pump is another close threaded adapter, the valve, then the remainder of the plumbing. In this case, I left a stub for another pump to be added, then a Cross that goes to the skimmer on the right, and a 1/4" speed-fit fitting on the left. I use this fitting for priming the Calcium reactor, feeding a bucket for acclimation, and spraying off rock as needed. The top of the cross heads up to the main frag tank. Inside the sump the pump intake has a strainer on it to prevent the fish/crabs/plants from being sucked though the sump. Strainers are available at Aquatic Ecosystems, or most online fish stores. Valve use and cleaning: 
First off, use QUALITY valves. When I first put this system together, I used standard hardware-store ball valves. Two years later, they had all jammed. As they were glued in, I had to cut them out and replace them. After they are cut out, they are pretty much useless Even if I did clean them I would not use them again. Remember that the valves will need to be removed for cleaning occasionally. Valves will tend to clog and jam over time. Making them removable is important for long term use. As shown above, the pump as one of these valves on each side. To remove the pump, both valves are turned off. The drain plug is removed from the pump, allowing the water to drain in to a plastic bucket lid, then the unions next to the pump are loosened, and the pump is slid out. The closed valves keep water from escaping from the sump, as well as from back-draining from the tank above. Note that the top valve a can also be used to throttle the water flow from the pump if needed. To remove and clean the valve to the right, you must plug the water flow from the sump with a standard pipe cap. Remove the strainer from the intake line, and install a screw-in pipe plug, from the hardware store. Then turn off the top valve, drain the pump, and remove the bottom valve. It is best to keep a spare valve on hand so you can replace the valve with a new one as you clean it. Take the removed valve and soak it in a 1/2 cup of vinegar in a gallon of warm water. Let set for several hours. If it does not come clean, scrub with a soft brush, replace the water and vinegar and soak again. Overnight is fine too. Overflows to sump: 
See the Overflow Plumbing Guide for information on the actual overflow. We'll start here with the drain line to the sump. You have several choices here. What I normally do is to attach the plumbing under the stand to hold the weight, then drop vertically in to the sump as shown here. This is easy to do, and allows a lot of flexibility. If the sump is designed for it, you can also have the water enter via bulkheads in the top or end/side of the sump. This works fine, and is recommended for big systems or setups where the plumbing might come loose. If you have a filter sock, then you need to have the water drop in to the filter sock first. © 2004-2018 Barr Aquatic Systems. All Rights Reserved
|