Home
Advantages of Barr Systems
Pumps
Instructions
DIY Threads
Order Page
|
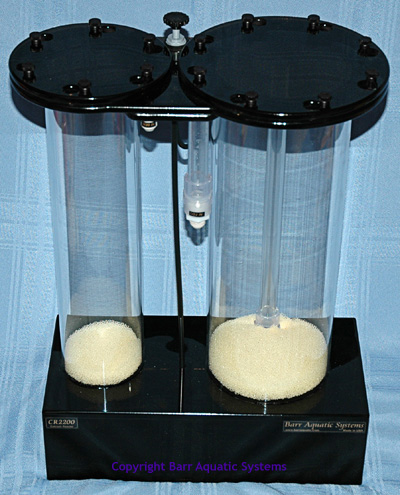
Calcium Reactors:
CR1200, CR2100, CR2200
Inspection:
Inspect your new reactor closely upon receipt. Any damage must be reported to the shipper with 24 hours, or they may not cover the damage. Contact us immediately if there looks to be damage. We will repair or replace the part(s) as needed. Unfortunately we can take no action until the damage claim is validated by the shipper.
Things to look for:
- Check the box for damage before opening. Take pictures if it looks obviously holed or crushed
- Check for cracks in tubes, especially where they glue to supports or flanges.
- Check that all O-rings and thumb screws are accounted for.
- Compare the invoice to what is in the box to insure that all items shipped were received.
Installation:
Each reactor comes with a needle valve for output control, and a 1/4" Speed-Fit for water input.
- You should never need to use pliers on the black thumb-screws, just snug them up by hand.
- Install the regulator on the tank, as per the instructions included in the regulator. Follow them exactly, or the regulator can be permanently damaged.
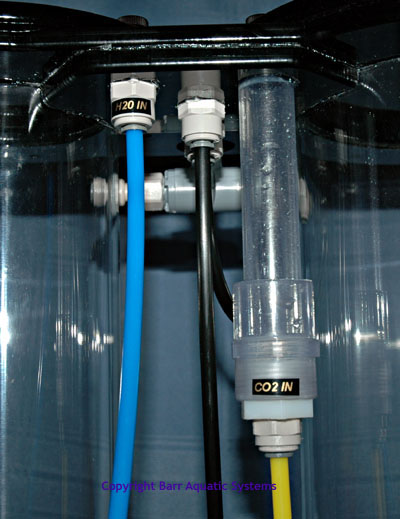
- There are three fittings on or near the underside of the top flange. One each for water in, water out and CO2 in.
- Attach the CO2 (Yellow) line from the regulator to the CO2 in port (bottom of the bubble counter).
- Attach the reactor feed line (Blue) to the remaining fitting on the underside of the top flange (marked H20 IN).
|
|
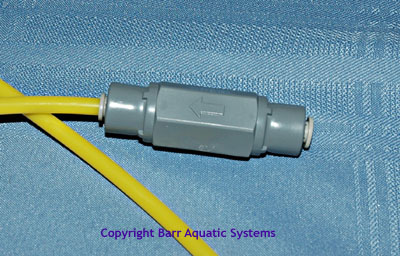
- Install the gray check valve in to the CO2 line (Yellow, just cut the line and insert it any place). Watch the arrow on the check valve- It should point towards the reactor (the direction the CO2 moves though the line).
|
|
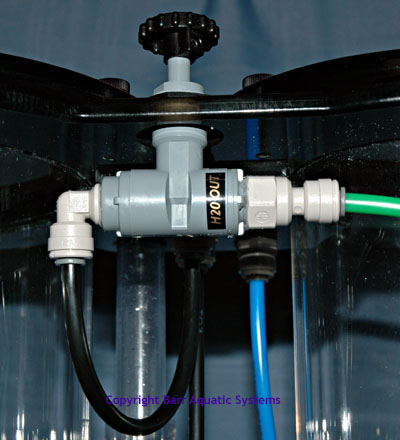
- Attach the water out line (Green) to the gray needle valve (marked H20 OUT), and run to a location where it can drip in to the sump. The water exiting the reactor is called the Effluent. If you have a BAS skimmer, you can run it to the CO2 Effluent fitting on it. It is strongly recommended that you use a flow meter so you can keep an eye on the flow if you run the effluent to any place where you can't see it drip in to the sump. If you ever find the flow has been reduced to zero for some unknown period of time, stop, remove and flush the reactor with fresh water. Restarting a reactor that has been stalled for a long time can wipe out a tank due to accumulated hydrogen-sulfide gas that gets dumped in to the system.
|
|
- For the reactor feed line, you can just pull from the sump for small to medium tanks. If it is having problems keeping up with the calcium load, you can pressurize it with a small power head and that will make more calcium dissolve in to the water. Drill the sump frame or use a clamp to hold the line under water. You can also use the Media and Probe Holder unit, available as an option.
Filling:
- Open the effluent control valve (Gray needle valve) all the way.
- Remove both reactor chamber lids. To fill the reactor, place the foam pads in the bottom and fill with media to within 1/2 inch of the top tube inside the main chamber (flow tube). It is important not to let any media down the flow tube as this may affect pump performance. Do not pack the media in so tight that the foam pads get crushed.
- Fill both chambers to the top with tank water. Make sure the main chamber is as full as you can get it. The key is to get most of the air out of the main chamber, before turning on the pump. Otherwise you will get an air-lock in the pump and it will not draw in water and may overheat.
- Alternatively, you can attach (or hold) a power-head in front of the water in line, and let it fill it. This is slower, but works well.
- Insure that the CO2 regulator is turned off or the solenoid is unplugged.
- Install the lids. Watch the O-rings carefully- If they are not seated in the grooves it will leak. Snug down the thumb screws, but don't use tools on them. They should be finger tight only.
- Using a power head, force water in to the water input line until all the air stops coming out the output side.
- Continue forcing in water via the power head, and plug in the main pump. This will help force the remaining air out. Keep flushing the system until you can't hear the pump suck air in to itself and it is running cleanly. The water will be milky for a while unless the media was well washed.
- Once you have the reactor primed and running, you should not see many bubbles in either chamber. You should get a steady stream from the effluent line (Green) and can remove the feed pump if desired. Dial the effluent stream down to 60-100ml per minute by adjusting the effluent valve.
- Plug in the solenoid on the CO2 regulator which opens the valve. Adjust the CO2 to 20 bubbles per minute as counted in the bubble counter attached to the reactor. As the water is drawn into the reactor and mixed with each CO2 bubble, you should hear the pump process it. Let run and stabilize overnight. You are looking for a pH in the effluent stream of 6.8-7.0.
Bubble size:
If you have the Milwaukee regulator it also has a bubble counter included. The bubbles in the counter on the Reactor are THREE times as large as the bubbles in the small chamber on the regulator. Therefore 20 bubbles per minute at the reactor is equivalent to 60 bubbles per minute measured at the regulator. The large bubbles are easier to count when you get to high calcium demands.
Leaks:
Occasionally a unit will weep water from one or more O-ring joints. This is not abnormal, and usually can be easily corrected. All units are water tested before they leave the factory so it should be possible to get it to run dry.
You can use these steps to help stop the leak.
- Make sure the O-ring is seated, and no sand or grit is in the groove.
- Check that the thumb screws are snug. You can squeeze the flanges together with one hand, and tighten the screw with the other to get them tighter, without resorting to pliers.
- Seal the O-ring with O-ring sealant, or Vaseline.
- Let it set for a few days, then snug it up again- As the O-ring seats, it seals better.
- Sometimes the pump will develop a leak past its internal O-ring. This means the pump needs to be slid out of the base, and the O-ring needs to be lubricated, or sometimes, sealed with aquarium sealant.
- Contact us if you cannot get it to seal or if you suspect a leak from a place that does not have O-rings.
Tuning Tips
- Measure your Alkalinity and Calcium levels before starting the reactor as a reference point. Its best to have both levels already at the level that you want to maintain.
- Reactors need a period of time to settle in and perform correctly. Only adjust one thing at a time (effluent drip rate or CO2 bubble rate, not both) and let it settle for a half day before taking measurements. Reducing the CO2 bubble rate will raise the output pH of the water, resulting in a lower output of calcium. Reducing the effluent drip rate also reduces the calcium output from the reactor.
- To avoid measurement swings try not to add any additional supplements (Kalkwasser, Buffer, Calcium) as you tune the reactor. If you must add some, allow the system to settle for a day before continuing with the tuning process.
- The job of the reactor is to maintain Alkalinity and Calcium in balanced levels. During the tuning process (which can take up to a couple weeks), you may have to add either Alkalinity of Calcium manually if the reactor can't be adjusted to keep up with their consumption.
Settle in time:
Reactors need a period of time to settle in and perform correctly. Only adjust one thing at a time (water flow or CO2, not both) and let it settle for a half day before taking measurements.
Reactor Refills:
Reactors will need the media refilled over time. If sized correctly for your system, they should last about 3-6 months between refills. At refill time it is a good idea to remove all the media and flush out the unit with water. Rinse the sponges to remove any grunge. Rinse the mud out of the old media, then replace it in the unit and top off with new media. Be sure to keep media from getting into the flow tube inside the main reactor chamber while doing this.
Final Note:
Although the reactor will make adding Calcium and Alkalinity easy, its up to you to routinely test for them. As your corals grow they so will their Calcium and Alkalinity demands.
© 2004-2018 Barr Aquatic Systems. All Rights Reserved
|
|