DIY- Underwater Bulkhead Replacement:
4/22/04
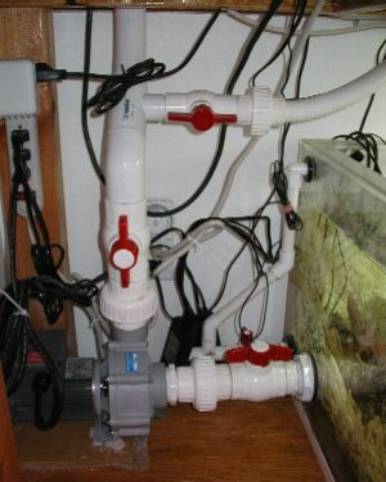
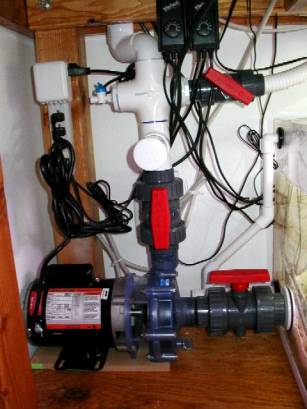
This project was a lot of fun. In order to fit in a new pump (Sequence StingRay) I needed to reverse a 1.5" bulkhead that was located at the bottom of my sump. If I flipped it around so the nut was on the inside, I got another 1/4", which is about what I needed to get the new pump to fit. Here is the Before picture:
Note the Unions on both sides of the pump (Good idea!) Also note the cheap ball-valves that are glued in place (Bad idea!) Part of this project will be to replace the valves with dual union ball-valves. These valves have calcium built up inside of them, and about half of them are permanently jammed. With the new valves, I will be able to pull the entire valve out and soak it if it ever sticks.
The tricky part of this setup is that I did not want to drain the water level in my sump/refuge all the way to the bottom. Taking the water to within 1" of the bottom means everything in the tank is high and dry, including the one lawnmower blenny that there is no way I could catch (He drafted a ride down the return from the frag tank months ago). With a 4" DSB, it also means draining the water from the lower levels, which could have really bad effects.
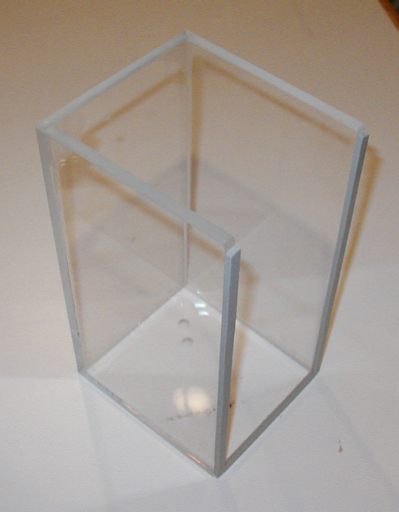
To solve that problem, I built a device that lets me change bulkheads underwater, without draining the tank. It looks like this:
It is a four sided box made out of scrap 3/8" acrylic, with 1/4" foam weather stripping tape on one side. To use it, you place it in the tank up against the wall, then pump the water out with a power head. The water pressure from the water on the outside of the box presses it against the wall of the tank, making a water-tight seal and leaving the bulkhead dry. The box measures 6" x 6.5" x 11.5". That is enough room to get your hand down inside and remove/replace the bulkhead, but is not so large that it would hit my rockwork.
The one down side is that the water pressure is also pushing up on the bottom of the box- In this case, 39 square inches of surface area at about 12" deep (.42psi), is 16.5 pounds of force trying to lift the box. Countering that is the 92 pounds of force holding the box against the wall. As I determined at a critical juncture, that was not quite enough. :)
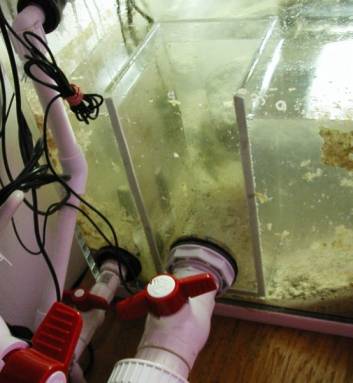
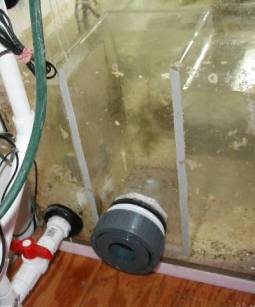
Onwards: Moving the sand out of the way stirred up a silt storm, hence the cloudy water, but here is a shot with the box in place. The left hand 1/2" bulkhead is my drain- To do a water change, I open it up and it routes directly to the floor drain. Above that is my emergency overflow- If the water level in the sump ever gets to within a 1/4" of the top, it goes though the bulkhead and direct to the drain.
Here the box after it has been put in place, and the water has been pumped out. It is staying in place great, which I found out later, is because it is hooked under the bulkhead which prevented it from sliding up. Note the 1.5" ball valve- That is as far "off" as I can get it.
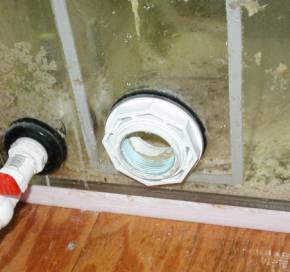
At this point I removed the pump and plumbing, as the "wet" side of the bulkhead was clear and dry and it looked like the rest of the missing was a "go".
Removing the bulkhead was easy- Loosen the nut, and pull it out. This is the point where I realized that the upwards force on the box was greater than the sideways force crunching the foam tape to the side of the tank. When I pulled off the nut, the bulkhead popped out and the box lifted about a 1/2", letting a stream of water shoot out. Of course I was crunched under the stand with my knee in front of the hole, so I got a shot of water up the leg, and nearly broke the lights with my head. With one hand desperately holding down the box, I got the new bulkhead in place and tightened down. Next time I'll use a spacer between the box and the sump frame, so it can't lift on me. I'll also setup the video camera. Moments like that should be shared. :D
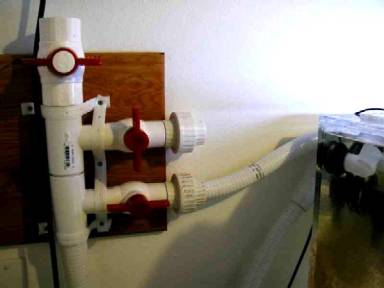
The rest was easy (if a bit damp). Install the pump (with 1/8" to spare) and replace the plumbing to the skimmer and tank. The dual union valves are available from the online aquatic stores. The 1/4" speed-fit fitting on the left of the Cross is for going to a Calcium reactor (not shown). The stub coming towards the camera is for attaching another pump. Some day I want to go with dual pumps so that if one dies, the other can still run the system. The top 1" ball valve goes to the skimmer. The digital timer is for the Kalk reactor, and the two black devices hanging from the stand is for the dual 200 watt ViaAqua Titanium heaters.
This is a shot from above the table- Before (old picture):
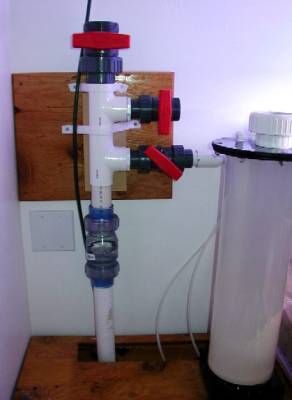
After:
I decided to add in a check valve, even though I don't like to rely on them. It is a dual-union valve in a location where I can keep an eye on it. I'll be testing it to see what it takes to make it fail. If it does poorly I'll just rip it out. So far, it has performed fine. Time will tell if calcium buildups will prevent it from working. The top 1" valve will go to another tank return on my Frag tank. The top 1.5" valve will go to a tank upstairs some day.
Overall it went well- The pump is louder than I like though, so I think I may replace it with dual Sequence 3600's, or similar.
© 2004-2018 Barr Aquatic Systems. All Rights Reserved
|