
|
| protein skimmers | calcium reactors | kalk reactors | waste collectors | custom sumps | overflows | accessories | | |
|
Home
Advantages of Barr Systems Pumps Instructions DIY Threads Order Page |
Overflow Box plumbing:All corner overflow boxes 
Inspection: Inspect your new boxes upon receipt. Any damage must be reported to the shipper with 24 hours, or they may not cover the damage. Contact us immediately if there looks to be damage. We will repair or replace the part(s) as needed. Unfortunately we can take no action until the damage claim is validated by the shipper. Things to look for:
Installation: Start by holding the overflow box in position.
If the tank is not drilled, mark where the bulkhead hole should be, and drill it now. On an acrylic tank, you may clamp the overflow box in place and drill though both the tank and the box at the same time. This insures that the holes lined up. 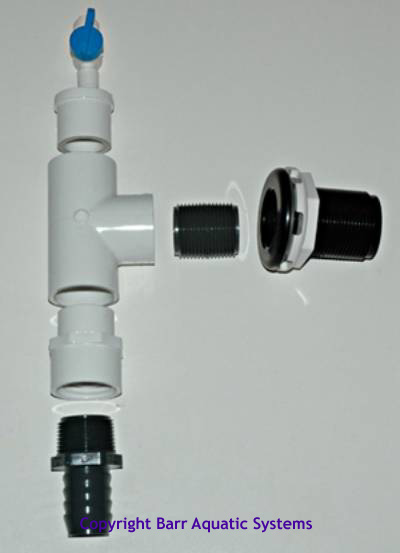
If you did not drill the box yet, hold it up to the hole in the tank and mark the bulkhead location. Drill the box. Dry fit the box in the tank with the bulkhead in place to make sure everything is sound. Apply a very thin layer of silicon tank sealer to both sides of the bulkhead gasket, and install the gasket on the bulkhead. Press the bulkhead though the tank, and in to the box. Install the nut on the inside of the box, and tighten down. Do not over-tighten, as the gasket can squeeze out. Install the 1" short thread piece to the bulkhead using silicon sealer on the threads, or Teflon tape. Install the Tee on the threaded portion remaining. Do not over tighten. Install the 1" street ell inside the box, pointed down. Attach the 1/4" black line to the valve. This helps silence the air intake. Attach your hose to the grey hose barb and run to the sump. First startup: Open the top valve all the way. Using a ball valve, turn down the flow on the main pump to a low level, and start the main pump. Watch the tank water level closely. When it stabilizes, open the pump control valve slowly and watch the flow. It is possible that the pump can put more water in the tank than the overflow can take out, so watch carefully! When you have set the desired water level and water flow, move on to tuning. Leaks: At this point you want to be checking for leaks around the threads and bulkheads. If any place is leaking, remove and reassemble with more Teflon tape or silicon sealant. Don't trust the leak to "get better over time", they rarely do. Tuning: To make the overflow silent, you need to adjust the air intake valve to let just enough air in to match the water flow. This can be done by slowly closing the valve a tiny bit at a time, and watching the water in the overflow box. When adjusted well, the water in the box will stay above the elbow, and there will be no sucking sound. Again, watch the tank water level closely here- Too much air can prevent the water from going down, and lead to a tank overflow. If you run the black line to the tank just above the water level, it may help prevent an overflow. If the tank water level gets high enough to prevent air from entering the line, the suction on the line goes up and it will pull more water out of the tank, dropping the tank level until it can suck air again. Not as good as a redundant overflow setup, but might help. Cleaning: Over time, the black line can get clogged by salt creep. Let it suck up some warm RO water once a month to flush the salt though the system, and remove and inspect occasionally too. The salt does tend to build up behind the valve, and can get quite hard. 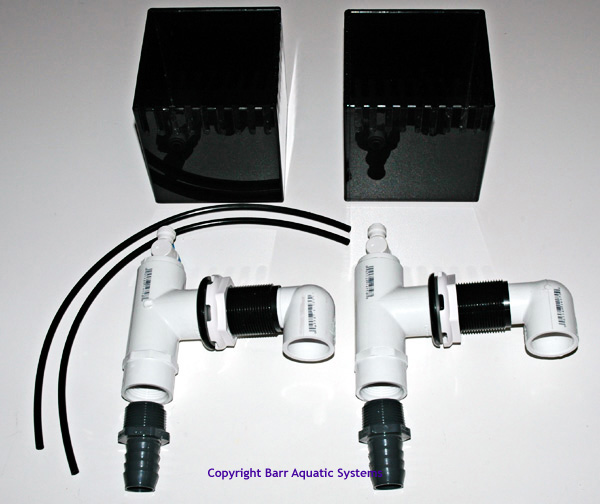
© 2004-2018 Barr Aquatic Systems. All Rights Reserved
|