Home
Advantages of Barr Systems
Pumps
Instructions
DIY Threads
Order Page
|
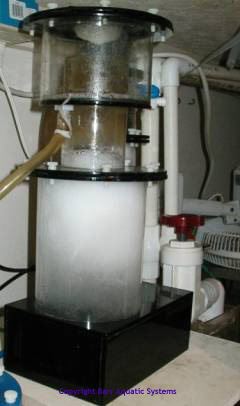
Standard Skimmers:
SK1020, SK1220, SK1620
Inspection:
Inspect your new skimmer closely upon receipt. Any damage must be reported to the shipper with 24 hours, or they may not cover the damage. Contact us immediately if there looks to be damage. We will repair or replace the part(s) as needed. Unfortunately we can take no action until the damage claim is validated by the shipper.
Things to look for:
- Check the box for damage before opening. Take pictures if it looks obviously holed or crushed.
- Check for cracks in tubes, especially where they glue to supports or flanges.
- Check that all O-rings and thumb screws are accounted for.
- Compare the invoice to what is in the box to insure that all items shipped were received.
Installation:
Each skimmer comes with a gate valve for output control, and a 1" hose-barb for water input. The hose-barb may be removed from the gray heavy-duty Ell on the input, and replaced with a 3/4" hose-barb, or a union for direct plumbing of PVC to the unit. It is suggested that 1" pipe be run from the pump to the skimmer for best performance. 1" Flex PVC or clear PVC can be found at the local hardware store in the U.S., or from Aquarium supply sites online. Flex PVC can also be found at pool supply houses in towns, as it is used in hot tubs.
Things to look for:
- Check O-rings to make sure they are seated correctly.
- Remove and reinstall the Beckett from the housing so you are comfortable with it. You will need to clean this every few months, more often if you have lots of snails that get pulled though your pump.
- Line up the nylon hose-barb to the direction you want it to drain, and tighten down the thumb screws.
- You should never need to use pliers on the thumbscrews, just snug them up.
Make sure the input plumbing has enough slack (or a union) such that you can get the top off of the input column to clean the Beckett as needed.
For the output plumbing, you have two choices:
Inside the sump: If you can locate the gate valve at the water level, or if your water level in the sump never changes due to evaporation, you can run without any extra plumbing. If your water level does change at all, the output of the skimmer must be above the water level at all times. Come out of the gate valve with a male pipe thread (MPT) fitting, then go to a Tee that is vertical. On the down side of the Tee, install a short piece of pipe to direct the water down to below the water level of the sump. On the up side of the Tee, install a 3" long pipe with a cap on it. VERY IMPORTANT: Drill a 1/4" hole in the cap. Without this hole, the plumbing will create a siphon, and it will be very difficult to keep a consistent water level in the skimmer. Again, the hole is there to let air in to the output plumbing, to prevent a siphon.
Maximum sump water levels for in-sump installation- SK1020: 6-7" deep, SK1220: 9-10" deep, SK1620: 15-16" deep.
Make sure there is enough headroom to remove and reinstall the skimmer cup.
Outside the sump: The skimmer must be located so that the output plumbing never reaches higher than the anticipated water level in the skimmer. For all models, that is 2-4" or more below the main flange on the main tube, depending on how dry you would like the foam to be. Place the skimmer in a secure location and plumb to the sump. Most all locations will require the use of a Tee as described in the above inside the sump instructions. This Tee is important for preventing siphons, which make it very difficult to keep the water level consistent in the skimmer.
Install a short length of hose on the air intake valve to help silence it. You can also install an air filter to this hose if desired. Contact us for more information.
First startup:
Make sure the gate valve is wide open. Turn off the blue air intake valve, and turn on the pump. Be ready to turn it of fast if there is a plumbing problem. If all is well, the skimmer input column should fill full of water, but the main chamber should be near empty. Let run for a few minutes to settle in.
Open up the main air valve 1/2 way, and let run. Make sure it does not overflow in to the skimmer cup.
Slowly close down the gate valve to raise the water level in the main column. Set the water level about half way up the column for starting purposes, let settle for an hour or more.
If you have the air flow meter, check what is reads. If the air flow is above 40 SCFH, turn down to about 30-35. If it is below that number, then leave the valves wide open.
If you can't get 35+ SCFH with your existing pump, then it may be undersized. This is normally fine for most systems it might be good to consider replacing it if you are using the skimmer on a larger system.
Adjusting the water level:
- This is greatly dependent on the level of contaminates in the system. Note that the skimmer can pull out gallons of water in a short time so always monitor the breaking period closely, and use an auto-shut off waste collector if at all possible.
- Turn off the air input so you can see the water level.
- Using the exit gate valve on the skimmer, adjust the water level 6-8 inches below the neck of the skimmer.
- Turn back on the air and adjust to 30-35 SCFH.
- Watch the system and make sure it is not blowing excessive foam in to the cup.
- Allow the system to settle there for an 1/2 hour or so. Systems with high initial organic loads will require a lower water level, while systems with a light load can run the water level all the way up to the neck.
Over time the skimmer will pull down the organic level in the entire system, allowing you to raise the water level in the skimmer.
Leaks:
Occasionally a unit will weep water from one or more joints. This is not abnormal, and usually can be corrected. All units are water tested before they leave the factory so it should be possible to get it to run dry.
You can use these steps to help stop the leak.
- Check that the thumb screws are snug. You can squeeze the flanges together with one hand, and tighten the screw with the other to get them tighter, without resorting to pliers.
- Make sure the O-ring is seated, and no sand is in the groove.
- Seal the O-ring with O-ring sealant, or Vaseline.
- Let it set for a few days, then snug it up again- As the O-ring seats, it seals better.
- Contact us if you cannot get it to seal or if you suspect a leak from a place that does not have O-rings.
If it is leaking from the gate valve threads, then remove the gate valve and threaded insert and re-tape with Teflon tape. Use at least 5 wraps of good quality tape. Here is a good place to use the more expensive tape that comes in red rolls, as it is thicker.
Settle in time:
Skimmers need a period of time to settle in and perform correctly. This amount of time depends on your bio load, age of tank, types of feeding, and other conditions. For an established tank with a normal bio-load, it should start skimming within a few days. You may notice the foam production increasing slowly for several weeks. Check the skimmer daily and adjust the water level as needed. For a new tank with new water, it can take many weeks before there is enough bio load to start skimming. This is fine, run the skimmer anyway. It helps oxygenate the water, and will be there running when you need it.
Skimmer going "nuts":
Sometimes a skimmer will start foaming like crazy. This is normally due to a water change that it is reacting to. The skimmer can pull gallons of water from the tank in a short time. Using an auto shutoff waste container will shut down the skimmer in this event, and is highly recommended.
Things that can cause overflowing:
- Water conditioners
- Dead animals
- Live rock additions
- Disturbing large portions of a sand bad
- Medications like Maracyn
- Water conditioners like Novaqua
Conversely, the skimmer may shut down and have no foam at all for short periods of times.
This can be caused by:
- Putting your hands in the water (oil on hands)
- Feeding oily foods (Mysis, sardines, etc)
- Cooking oily foods in the kitchen- The air sucked in to the skimmer may pull in oil too. You can add a floss air filter to the skimmer intake to mitigate this if it is near your kitchen.
Misc. Tips:
If the Beckett starts to rattle too much, take it apart and wrap the little square pips on the center piece with Teflon tape, then jam it back together. You can also use a drop of superglue, but don't glue the whole thing shut, as it does need to come apart to be cleaned.
© 2004-2018 Barr Aquatic Systems. All Rights Reserved
|
|